
It has been my dream for some time to build an off grid tiny cabin in the woods. I know that this dream is held by many people my age but most don’t have the land or resources or know how to complete a task this large. Well I know one thing, I have no idea what I am doing but that has never stopped me before! I have the land and I am getting the resources as they are needed so its just up to experimenting and learning as I go. Lets dive into this project and see what happens!
In my county it is legal to install a “Storage Building” as long as there is no water or electricity hooked up and the building is within the 12 x 12 x 12 dimension restraints. This means that I can build my tiny house … er … I mean “Storage Building” and have off grid power and water and the county does not care. (They might if I was to tell them) So that is the goal. I don’t need a permit to build this building and I can still make the cabin in the woods. From now on this cabin in the woods, or tiny house, will be known as the “Storage Building”.
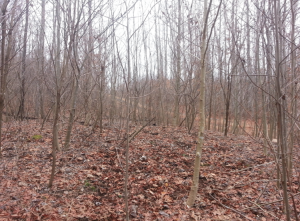
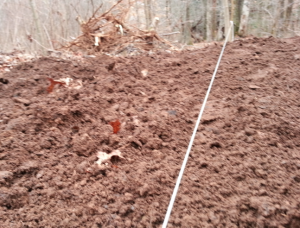
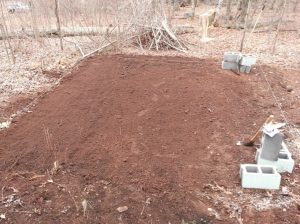
I walked around my property for some time looking for the location of the future “Storage Building”. I took into consideration a few things such as: How am I going to get water to the building? How will I install my off grid power? And can I get my tools to the location to even build this place? I found a place that fit the needs of all these considerations. Then I started looking at this new general location thinking about the level ground factor. Since I am in the mountains, the ground is far from level. There is a spot that I like the best out of all my options. (I hope you like the tense change happening here…) It is 200 feet from the creek that I am going to use for both the off grid water and electricity. Also the ground is not to uneven and wont take to long to level out. There was one main concern that I need to take care of if I am going to use this spot as the build site. There are several small trees that litter the ground and there is one large red Oak that is towering over the spot.
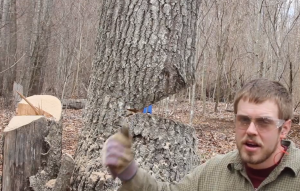
I took out my little saw and cleared the small saplings that were growing all over the building spot and tossed them aside into a pile. Next I began working on the large Red Oak. I hate to see that all the Red Oaks are dying here in the mountains. Some bug has been killing them all off. So this is one of the main reasons that I was concerned about the spot I selected to build on. That large tree needed to come down to make the “Storage Building” safe for the future. Now I am not skilled with the chainsaw and it was very nerve racking to take down such a large tree! You can watch this tree removal on Adventure 24.

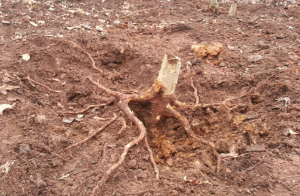
Now that the trees have been cut out of the way I also had to get the stumps out of there. I used a come along and spade and mattock to remove the stubborn things. If you would like to watch that happen then check out the video here. I had never removed a stump before in my life and I did not know just how tough they were to remove by hand. I can see why people use a bull dozer to remove them. (My uncle got a bull dozer and now he has zero trees on his land.)
After I removed all the trees (This took several hours of hard work) I started to look into how I was to get the ground level. I dont own a backhoe so all the work that I needed to do would be by hand. There are a couple tools that I used extensively. The first of these is the mattock. The mattock has a spike on one end and a hoe blade on the other. Very useful for pulling dirt lose and breaking rocks out of the soil. Next I used a spade (the pointed shovel.) This is one of those tools that stays in my car at all times. You just never know when you will need a good spade. Lastly I used a yard rake. Not one for leaves but the type with the small spikes used to pull dirt across the ground.
I broke ground with the mattock then used the spade to pull the dirt out of the hole then used the rake to spread the dirt around.
––
Once the dirt had been loosened enough to spread out the soil to the lower level of the foundation I then attached string to sticks so that I could use a level and make sure that the ground was level. First I made sure that the string was tied well on one corner of the plot. Then I used a level on the string and tied the other end to another stick. I used the level line to judge if I was getting the dirt down even. This method seemed to work well. It helped me realize that I needed to do a lot more digging.
––
I used several strings to get the foundation level. In the end I left the four that composed the boarders of the 12×12 foundation.
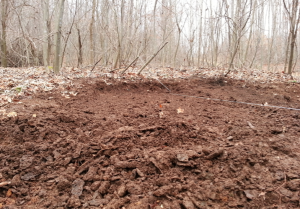
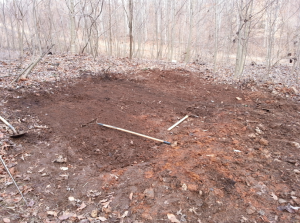
The final leveling was hard to come by because there was always one corner that was a little taller than the other. I was able to get the foundation level and there were a couple feet on each side of the 12×12 that allowed me some room to work. I know what you are thinking : “why not just rent a small machine that can level that place very fast”? Well I had thought about that and the reason is that the building spot is at least 40 feet from the road and I am not looking to mess up the land around the building spot.
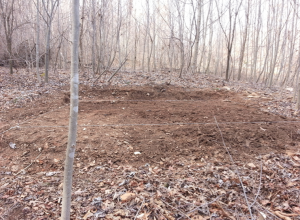
Here is the finished level spot!
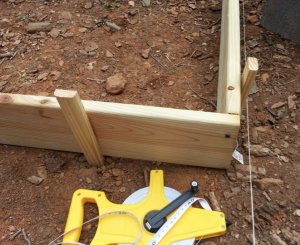
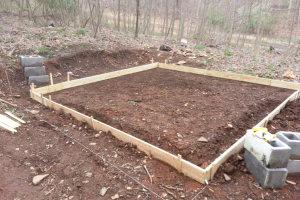
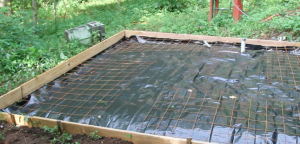
Now that the ground is level it is time to start getting ready for the concrete. I knew what to do in order to get the ground level but I was a little lost as what to do for making a frame to pour concrete. So I turned to youtube and started watching videos on wood frames for pads. There were not that many to select from surprisingly. The process seemed simple enough, just use boards held together with screws and use pegs to hold the boards in place. So I went to Lowes and found that the 10′ decking boards were only $6 so I purchased 5 of those. I would need the 5th one because the pad was to be a 12×12. I set out the four boards in the general place that they would be set up then I cut the last one into four 2′ pieces. These last four little boards I set up beside the others. I used a tape measure to mark out 12′ in all four directions then I measured across the diagonal directions to make sure that both of those were the same. This came out to be essentially 17′. … 12^2+12^2 = C^2 … 288=C^2 =16.97′)…. Both sides came out to be the same and I was happy. Now after I had framed everything up I then realized that I needed to have something called footers. These are troughs in the ground that are lower than the rest of the pad. It helps to prevent cracking in the cold due to frost line. So I dug more out around the edge of the foundation.
––
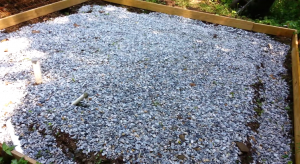
Once the Boards were installed and the footer space was dug, it was time to install the gravel on the dirt. The gravel is placed to let water run off below the slab. (I guess) I did not pack this down as much as I should and I hope that this does not pose a problem in the future. After the gravel I installed a vapor barrier. This is nothing more than a thick plastic. The barrier that I used was a 25×10 black plastic 6mil thick. It was able to cover the foundation with a little left over that I overlapped to make a double protection. The reason that you have to install one of these barriers is to prevent moisture from rising up from the ground and getting into the building. I read that concrete is very porous and allows water to pass through it very well. Now on top of the vapor barrier I placed metal fence like mesh that is used to hold the concrete together. Concrete has great strength when it comes to weight pressing down on it. But when you pull the concrete it will come apart. So in the cold months the metal mesh helps to keep the slab together.
––
This concludes the prep for the concrete. Now its time to get the real work started.
Let me tell you. Its not easy pouring concrete by yourself. To pour the concrete by means of a cement truck it would have cost over $500 because my pad is off the road several yards. The cement would have to be pumped from the truck. I figured that I would mix and pour myself. There was a local sand and rock place in my town and I found that the rock was $16 a ton and the sand was $30 a ton. I got two tons of rock and one ton of sand. I had to barrow my neighbors truck and trailer. I went to my local rental place and got one of their mixers for $70. Then I started the work. Check out this video showing the work that I did:
Now that the foundation is done its time to get to work on the blocks. At this point you could use fasteners into the concrete pad and build the wood frame up from there but I have so many blocks left over from my “dam” project that I wanted to get rid of. So I will be laying four layers of blocks as the base of the tiny house.
Let me first start off by saying that I went into this project with zero experience laying blocks. After four layers I was able to pick up a small level of skill but I can see that a lifetime of learning and practice would be needed to get good.
The Blocks that I have to use are from an old building that had been torn down. So since these blocks are used they have lots of old cement on them. Before I can use these blocks I need to clean them up by removing the old cement. I was able to use a chisel and hammer to remove the cement. At first I used a chisel that belonged to my father. Looking back I should have purchased a chisel designed for working with concrete before completely destroying my fathers. It took me at least 50 blocks to realize this. I then purchased a chisel called Dasco Pro cold steel. It was designed to be hit against concrete. Let me tell you it worked much better. The old wood chisel would bend and I would have to hammer it back into place. This new chisel is tough. Over 100 blocks later and there is no sign of it betting bent or warn.
––
You can watch the cleaning process before I had the right chisel here:
Once the blocks had been cleaned of cement I then hauled them up to the foundation of the tiny house. Blocks are rather heavy. 40 pounds a piece. The place that I had stored the blocks was about 50 feet from the tiny house so needless to say I was rather tired after hauling over 100 blocks. I placed the first layer of blocks on the foundation to see just how many I would need to make a full corse. You can see this in video here:
Now its time for something that I have never tried in my life. Laying blocks. I purchased a nice trowel from my local hardware store. I also purchased a wheelbarrow so that I could mix my mortar. I had read that the proper ratio for mixing mortar was 3 parts sand 1 part cement. So that is what I used. Seems to have worked well. But I am getting ahead of myself. First I needed to prepare the foundation for the concrete. I swept the concrete then I took a chalk line and snapped 8″ along the side so that I would know exactly where to place the blocks. I used a plastic bucket to measure the materials and a shovel to get the materials into the bucket. Once everything was measured out I plopped everything into the wheelbarrow. I was not sure how much water to use so I just started to pour water in until it seemed a little soupy. Then I scooped up some mortar on the trowel
You can see all this in action in this video:
After getting the first layer of blocks installed I wait a while then get to work on the second layer. The second layer of blcoks is actually about the same as the first. You can watch this part here:
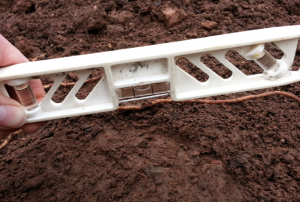
Bent Anchor Bolts
After the blocks have been installed I move to the last step that involves concrete. This is known as the bent anchor bolt step. The purpose of these anchors is to attach the blocks to the wood of the tiny house. The anchor looks like an L with threads on the long part. This L shape allows the anchor to install in the middle of a block and then have concrete placed around it so that it is strong. In this next video I will show you how I installed the anchors into the concrete.
This concludes all the foundation and block steps in this tiny house build. Next we will be moving on to working with wood!